It’s just a pigment of your imagination.
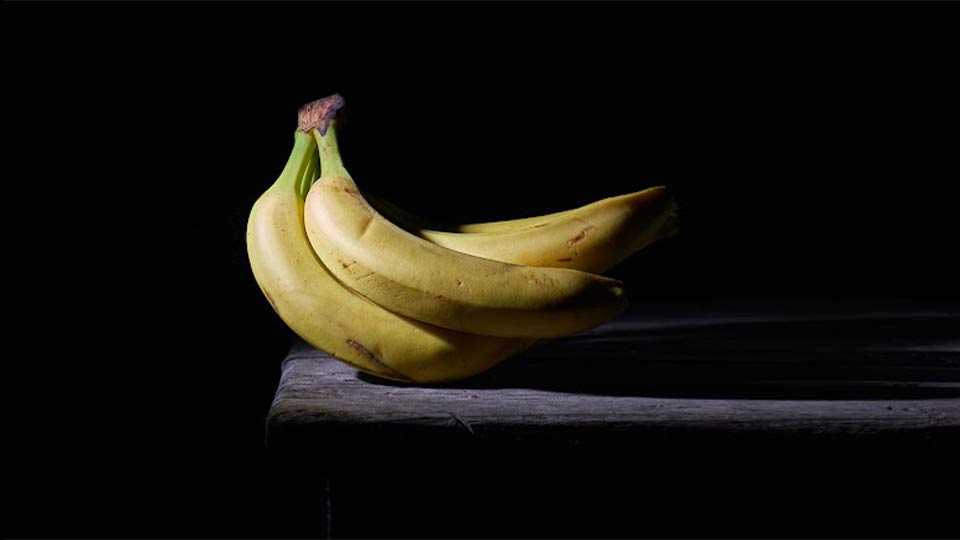
These bananas are not yellow.
You are almost certainly looking at this image via a screen that only produces red, green, and blue light. These are the “primary colors” of light, and—just like we teach our kids with crayons and finger paints—you can mix them to get any color you want. Right?
We make that statement like it’s a natural property of the light, but really, it’s a property of our human eyes. Humans do not have a specific sensor for the wavelength of yellow light. We can only see red, blue, and green light.
Even when looking at a real banana in sunlight, our eyes are seeing red+green and telling us that it is yellow. So while we don’t see yellow, we all perceive that said bananas are yellow.
Color perception
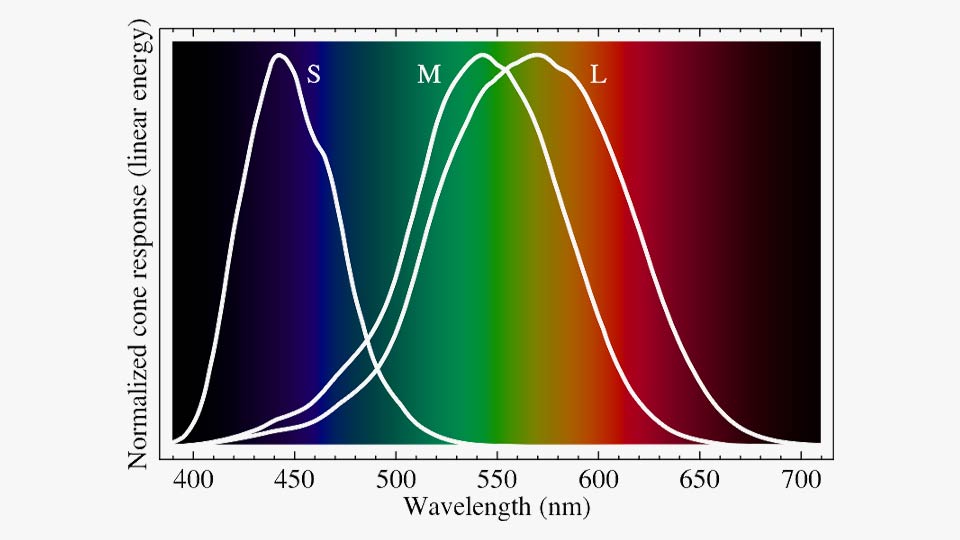
Your color perception is based on two main types of cells: rods and cones. The rod cells are very sensitive to the amount of light, but they do not sense color. They are the primary source of night vision, which is why it’s difficult to see colors in low light.
The cones are more specific to the wavelength of the light, but less sensitive overall. Most people have three types of cone cells (though a rare few people actually have four). Each cone cell type can pick up a little section of the color spectrum, each with its own peak sensitivity. Since we only have these three input values to go by when trying to detect colors, it makes sense why we can’t tell the difference between yellow and red+green.
Come to think of it, I assumed earlier that a banana in sunlight reflects actual yellow light, which we see as red+green. I really don’t know for sure if this is true, though. I’ve only ever looked with my eyes.
A bit more
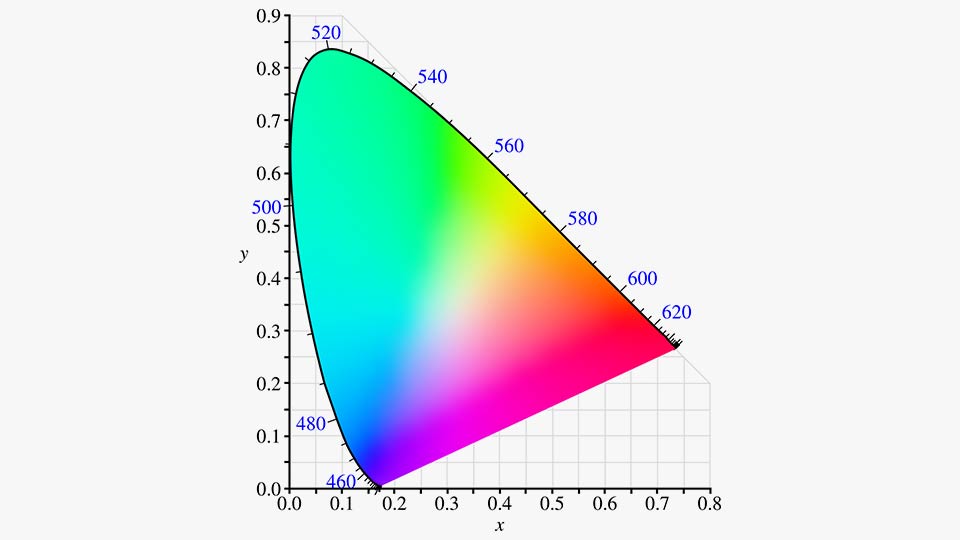
This bit of biology can also be helpful in understanding color spaces. This diagram is an attempt to categorize all the colors we can see. Along the top edge are the “monochromatic” colors, meaning they can be represented by a single wavelength of light. In the middle are colors achieved by mixing light of different colors. Each point on the map could be represented by several combinations of monochromatic colors at different intensities.
The triangle in this image represents the color that can be reproduced within the Rec.709 color space, standard for HDTV.
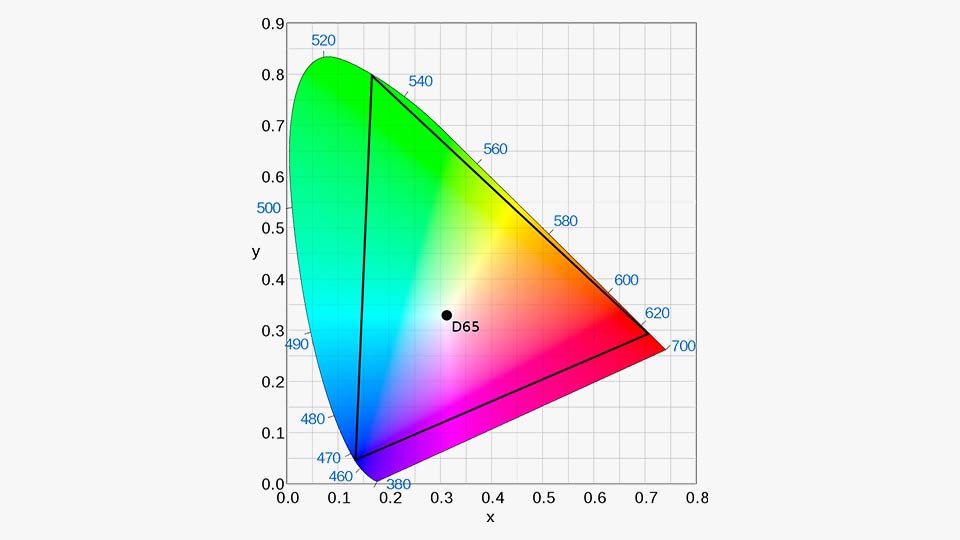
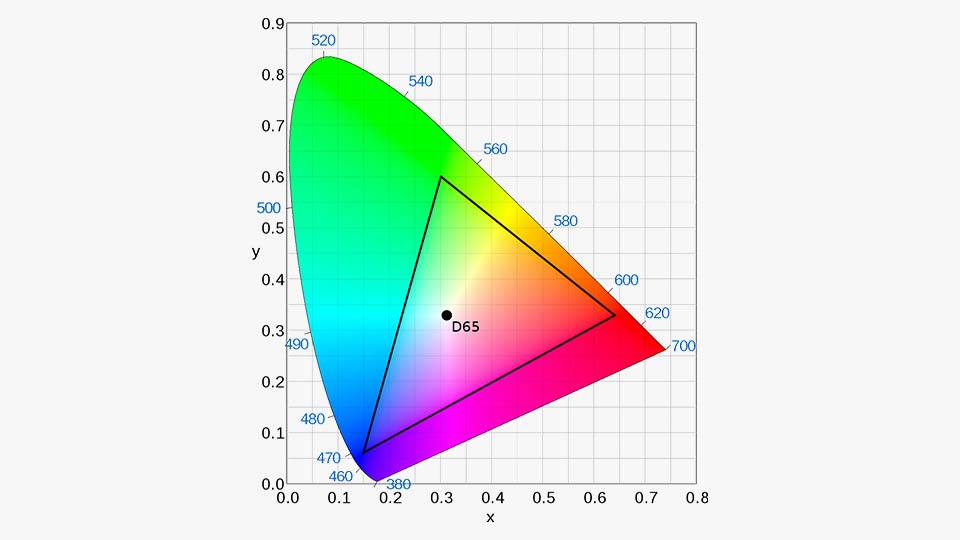
This one shows Rec.2020 color space, standard for UHDTV.
These two separate color spaces can both be represented by 8-bit numbers, by the way. This isn’t demonstrating 10-bit vs. 8-bit video types. It may be a little confusing, but even though RGB(0,0,0) is black in both color spaces, the color represented by RGB(0,255,0) is a different shade of green, depending on which color space you’re using to interpret it. Using 10-bit values instead of 8-bit values just gives you a more precise location within the triangle.
So, now that I’ve said R, G, and B aren’t even really the same R, G, and B everywhere, let’s take a look at values that are even more abstract.
YUV color
The YUV color system, like so many things relating to video production, relates back to early color television. The black-and-white broadcast was essentially just defining the intensity of the light, without colors. In order to remain compatible, that remained the primary broadcast, and the color information was tacked on separately (which is also what led to the “30000/1000” or 29.97 frame rate, instead of using 30).
In the color maps above, the “Y” value (height on the graph) is defined to be “luminance,” which is a measure of how bright something appears. It is the same Y as used in YUV, but the other two components are calculated differently. (The “U” and “V” are “chrominance” components, the blue projection and red projection, respectively). This is an image of the U-V plane, shown with Y at 50% brightness:
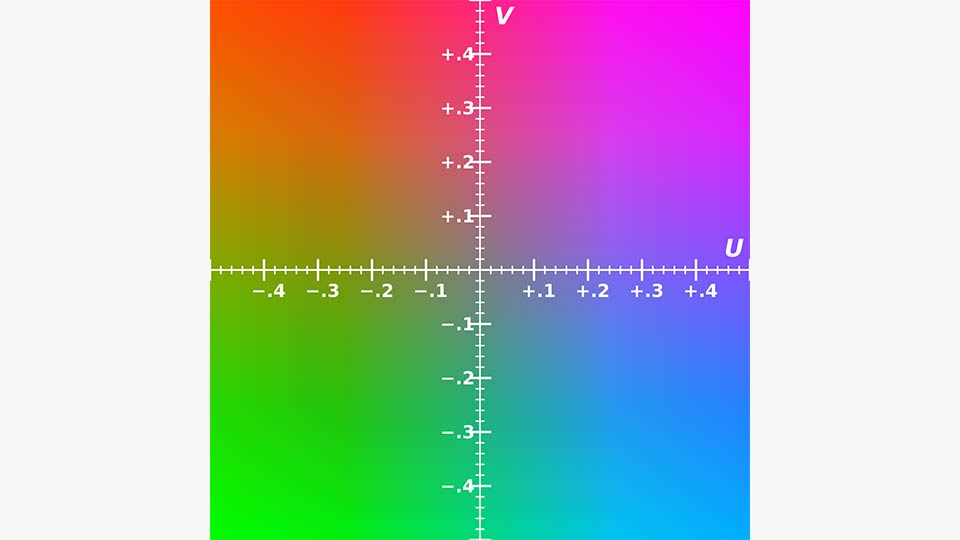
I mentioned earlier that the cones are not very sensitive compared to the rods. Well, we’ve discovered that we can reduce the amount of information for U and V, but keep all of it for Y, and that looks really good to our eyes. The difference is almost imperceptible, because we notice differences in brightness a whole lot more than slight differences in color.
A colorful experiment with RGB and YUV
This image shows a random smattering of colors. Using The Gimp image editor, I picked some colors and made some splotches, then scaled the whole thing down to mix it up a little, and this was the result.

I’ll take these colors and convert them from RGB to YUV, and then apply 4:2:2 and 4:2:0 chroma subsampling to them, to show what effect it has. On randomly chosen colors, this can have a pretty obvious effect, but on real-world video at higher resolutions, it’s almost imperceptible.
I’ll be using ffmpeg to convert this image into several pixel formats, and looking at the output with hexdump. I like to use the “canonical” output (the -C flag) for hexdump, because it shows an address at the left, then the hex value of the bytes, and then the ASCII character it represents on the right. For this raw image data, the stuff on the right won’t be much use, though.
First, we’ll dump out plain old RGB:
$ ffmpeg -nostdin -loglevel quiet -i original.png -pix_fmt rgb24 -f rawvideo - | hexdump -C
00000000  02 33 89 46 28 b1 d8 7d  2b 89 b6 29 b5 54 10 de  |.3.F(..}+..).T..|
00000010  ce 80 ff 2f 15 c6 62 63  e0 cb 8b 9d b8 b6 aa 8b  |.../..bc........|
00000020  8a ad b5 ba cf b9 fa c1  f2 bc ad db 8f 82 dd 8b  |................|
00000030  d1 cf 54 a1 df 98 6f 4e  8f 68 75 b9 b3 b9 8f b6  |..T...oN.hu.....|
00000040  b6 8b 50 78 b1 d9 dd d8                           |..Px....|
00000048
The rgb24 pixel format starts with the top left pixel and includes a byte each for red, green, and blue. Then, the next pixel to the right is given red, green, blue. This proceeds from left to right until the end of the line is reached, and then it starts the next line down from the left. The image is 6 pixels wide by 4 tall, so with 3 bytes per pixel, we have 6x4x3=72 bytes. Each line shows 8 bytes, so four and a half lines makes 72 bytes, as expected.
I can use Gimp’s dropper tool to select the top left pixel, and it shows a color value of RGB(2,51,137) which translates to hexadecimal as RGB(0x02, 0x033, 0x089) which match the first three bytes of the output. These same values can be used in HTML/CSS to specify the color as #023389 on a web page.
Packed vs. planar
I’m going to go off on a bit of a tangent, because that format is a “packed” pixel format, while many of the YUV formats are “planar.” In a “planar” format, all of the Y values are given first, then all of the U, and then all of the V (rather than telling you all three values for each pixel before moving to the next). To demonstrate this, I made a version of the image where all of the pixels are that top left blue color.

$ ffmpeg -nostdin -loglevel quiet -i allblue.png -pix_fmt rgb24 -f rawvideo - | hexdump -C
00000000  02 33 89 02 33 89 02 33  89 02 33 89 02 33 89 02  |.3..3..3..3..3..|
00000010  33 89 02 33 89 02 33 89  02 33 89 02 33 89 02 33  |3..3..3..3..3..3|
00000020  89 02 33 89 02 33 89 02  33 89 02 33 89 02 33 89  |..3..3..3..3..3.|
00000030  02 33 89 02 33 89 02 33  89 02 33 89 02 33 89 02  |.3..3..3..3..3..|
00000040  33 89 02 33 89 02 33 89                           |3..3..3.|
00000048
As you can see, this means the same three bytes get repeated over and over 24 times (one for each pixel).
$ ffmpeg -nostdin -loglevel quiet -i allblue.png -pix_fmt yuv444p -f rawvideo - | hexdump -C
00000000  38 38 38 38 38 38 38 38  38 38 38 38 38 38 38 38  |8888888888888888|
00000010  38 38 38 38 38 38 38 38  ad ad ad ad ad ad ad ad  |88888888........|
00000020  ad ad ad ad ad ad ad ad  ad ad ad ad ad ad ad ad  |................|
00000030  64 64 64 64 64 64 64 64  64 64 64 64 64 64 64 64  |dddddddddddddddd|
00000040  64 64 64 64 64 64 64 64                           |dddddddd|
00000048
The RGB(2,51,137) aka “02 33 89” pixel color converts to YUV(56,173,100) aka “38 ad 64.” This one also represents the same color over and over, but you can see all the Y values are grouped up, then all the U values, then all the V values. The math behind this conversion is documented pretty well here: YUV to RGB.
$ ffmpeg -nostdin -loglevel quiet -i allblue.png -pix_fmt yuv422p -f rawvideo - | hexdump -C
00000000  38 38 38 38 38 38 38 38  38 38 38 38 38 38 38 38  |8888888888888888|
00000010  38 38 38 38 38 38 38 38  ad ad ad ad ad ad ad ad  |88888888........|
00000020  ad ad ad ad 64 64 64 64  64 64 64 64 64 64 64 64  |....dddddddddddd|
00000030
When converted to a 4:2:2 sub-sampling, you can see that there are still 24 instances of “38” (one for each pixel), but the U and V values only have 12 values each. This is because each value for those planes now represents two pixels, so there are half as many. The top-left pixel and the one next to it must share U and V values (which doesn’t matter for this image because they were the same anyway).
$ ffmpeg -nostdin -loglevel quiet -i allblue.png -pix_fmt yuv420p -f rawvideo - | hexdump -C
00000000  38 38 38 38 38 38 38 38  38 38 38 38 38 38 38 38  |8888888888888888|
00000010  38 38 38 38 38 38 38 38  ad ad ad ad ad ad 64 64  |88888888......dd|
00000020  64 64 64 64                                       |dddd|
00000024
Using 4:2:0 subsampling squishes it down even more. We have 24 Y values still, but only 6 each for U and V. In this format each block of four pixels shares U and V values, so the top-left pixel is sharing with the one next to it, the one below it, and the one diagonal from it.
Color conversions
Now, let’s go back and see what those conversions do to the original image. Each ffmpeg command here will convert the original image to the requested subsampling format, and then it pipes that data into another instance of ffmpeg, which receives the subsampled format and spits out a new image. Even the 4:4:4 image (which doesn’t use any subsampling) isn’t exactly the same, because converting back and forth from RGB to YUV is a bit lossy, partially because of rounding errors.
$ ffmpeg -nostdin -loglevel quiet -i original.png -pix_fmt yuv444p -f rawvideo - | ffmpeg -nostdin -loglevel quiet -f rawvideo -s 6x4 -pixel_format yuv444p -i pipe:0 yuv444p.png
$ ffmpeg -nostdin -loglevel quiet -i original.png -pix_fmt yuv422p -f rawvideo - | ffmpeg -nostdin -loglevel quiet -f rawvideo -s 6x4 -pixel_format yuv422p -i pipe:0 yuv422p.png
$ ffmpeg -nostdin -loglevel quiet -i original.png -pix_fmt yuv420p -f rawvideo - | ffmpeg -nostdin -loglevel quiet -f rawvideo -s 6x4 -pixel_format yuv420p -i pipe:0 yuv420p.png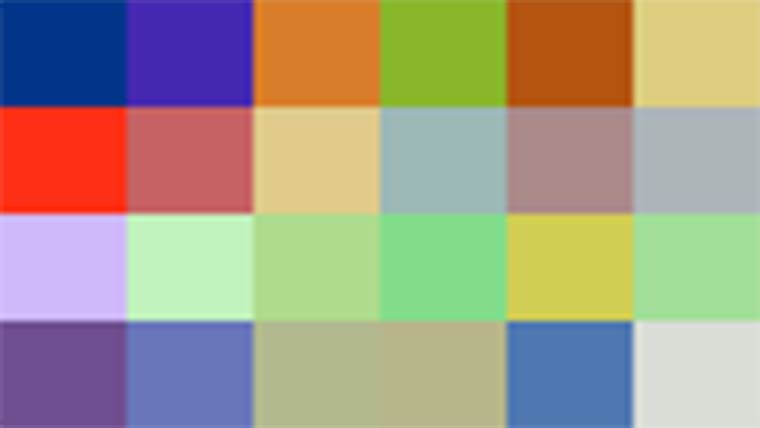

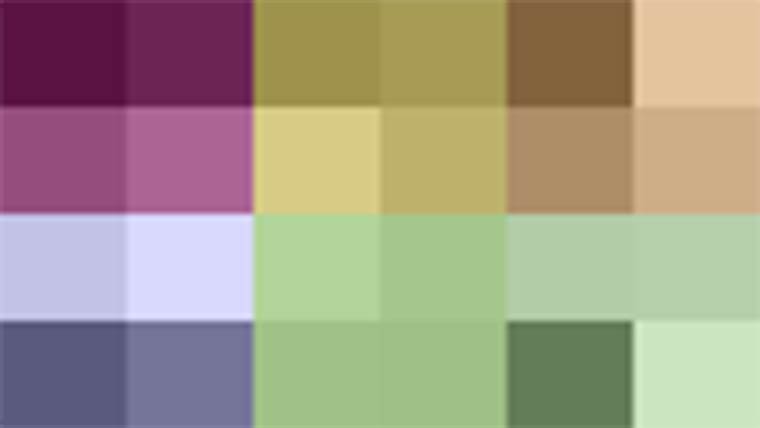
Going from 4:4:4 to 4:2:0, the pixels are arranged in side-by-side pairs. The top middle pair has a fairly noticeable change. The brown and green are averaged into a dirty yellow. Each pair of pixels has the same color value, but they get their own intensity value. Looking at the 4:2:0 image, it’s pretty easy to see the top left pair of blue pixels are averaged with the pair of red pixels below it so that all four of the top-left block of pixels have a purple color. Again, even though they have the same chrominance (color) values, the luminance (intensity) value is different, and so they still appear as different shades.
Seeing is believing
Finally, let’s take a look at what this subsampling does to a real image. Most of the images I found online were fairly highly compressed already, so I used Gimp to scale this one from its original 2701×1920 down to 1200×853 in hopes that this would ensure pixels that are next to each other were sufficiently different, even if the original had already gone through a 4:2:0 conversion (which is quite common).
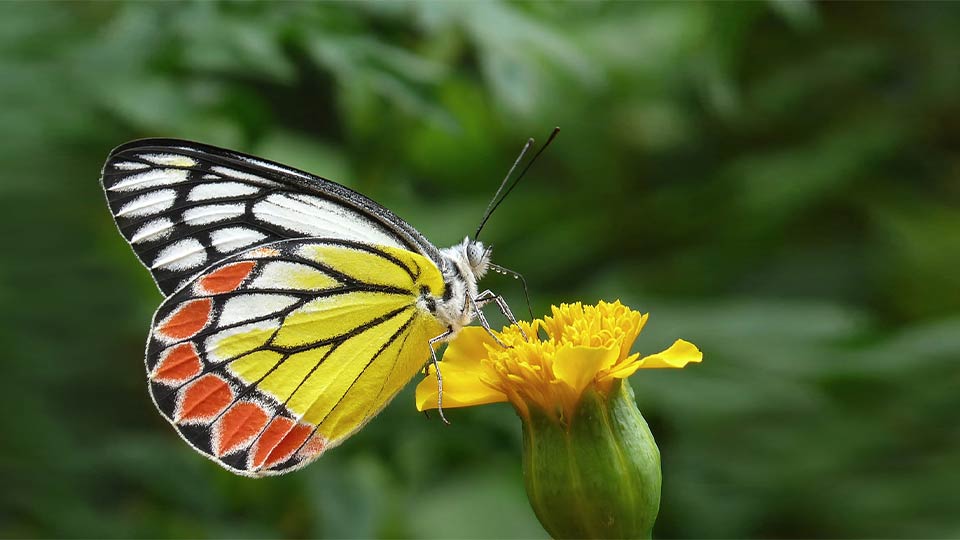
For FORMAT in yuv444p yuv422p yuv420p, do this.
ffmpeg -nostdin -loglevel quiet -i Common_Jezebel_1200.png -pix_fmt $FORMAT -f rawvideo - | ffmpeg -nostdin -loglevel quiet -f rawvideo -s 1200x853 -pixel_format $FORMAT -i pipe:0 Common_Jezebel_1200-${FORMAT}.png

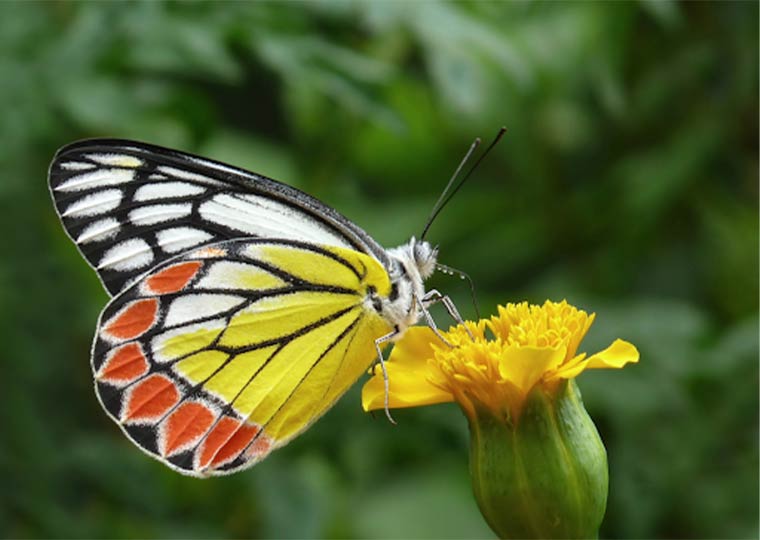
As you can see, the images with chroma subsampling are pretty much indistinguishable from the original. This is why so many cameras, especially consumer-grade cameras such as those on cell phones, produce YUV 4:2:0 video. It’s smaller to store, but still provides great quality.
There’s really no way to do chroma subsampling with the original RGB values, so RGB video is pretty rare compared to YUV formats. As you get deeper and deeper into compression methods, the numerical values of the actual bytes get farther and farther away from the simple RGB values we often associate with colors. However, they can almost always be converted back to RGB, since they are typically viewed on a monitor which has just those three colors for each pixel.
Red, green, and blue are the “primary colors” of light, but even that is a simplification of the way real light wavelengths work. It just happens to be good enough for our human eyes.
Jason Gyorog is a Software Developer and Product Engineer at Studio Network Solutions. As an expert in media post-production technology and a longtime fixture in the St. Louis arts community, he has helped produce numerous narrative projects with local filmmakers. Jason earned a B.S. in Computer Science from the University of Missouri at Columbia and created his own calendar widget for Android.